When developing objects or scenes in 3D we need to constantly move our point of view. We usually do that using the mouse and some helper keys to change modes. The problem is that it’s a 2D device, we can’t move and rotate the camera or the object efficiently as we would do in real life.
Mouse has 2 Degrees of Freedom (DoF). Moving and rotating requires 6 DoF.
One popular solution is using a 3D mouse, such as the SpaceMouse. This device has 6 Degrees of Freedom (DoF), that is, it can move and rotate in 3D simultaneously. It’s big limitation is that while the traditional mouse can be moved all around your desktop, the SpaceMouse can only be moved (or rotated) a few millimeters, which leads to far less precise (or quick) movements depending on the chosen sensibility.
Why can’t we use the full potential of our hands? Wouldn’t it be cool to move and rotate things in the screen just like we do in real life?
That is why I started developing Lemonity, a plugin for Unity that makes possible a more natural interaction. Hand movements are captured using LeapMotion.
After a few months of coding and debugging, Lemonity is finally available on the Unity Asset Store.
One of the most important steps when doing interactive haptics is calculating collisions between the object that user is touching and all the points of interaction of the haptic device. While most force feedback devices (such as the ones from Sensable) have only one, others (like many vibrotactile gloves) have more than ten.
Phantom 1.5 High Force with one point of interaction
A important limitation we must be aware of is that the algorithm in charge of calculating the haptic response needs to run in real time up to 1000 times per second, therefore it is mandatory to speed up all the calculations as much as possible.
The use of bounding boxes is a popular solution to save valuable computation time. Taking one point in space and checking if it’s inside the bounding box can be done very efficiently. However if the point is inside the bounding box we still need to calculate the distance to the surface in order to generate a force or a tactile stimulli.
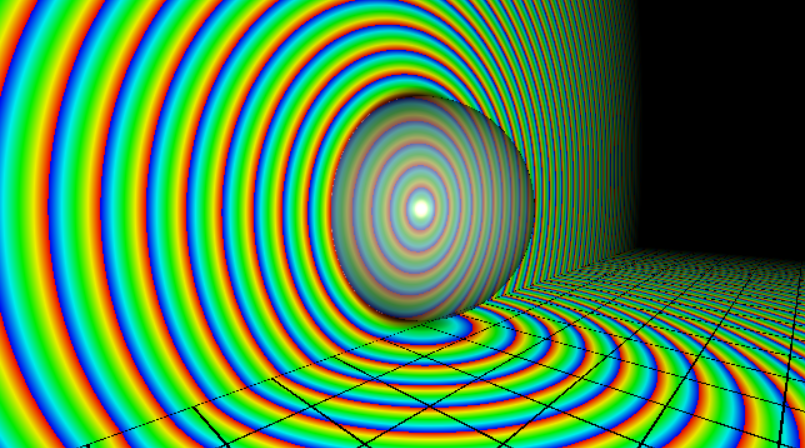
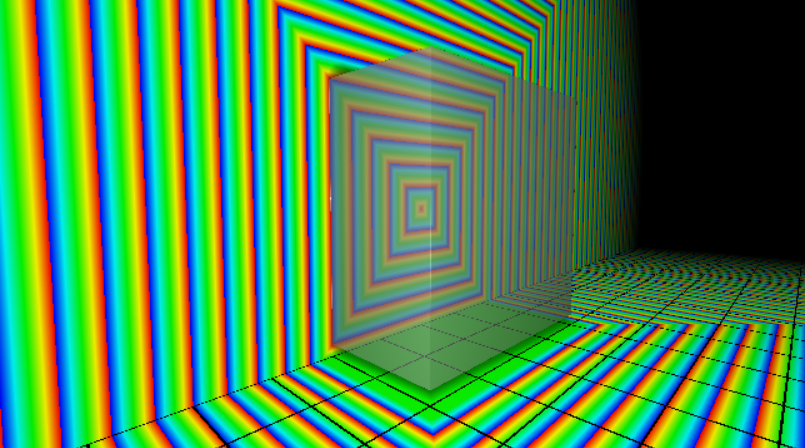
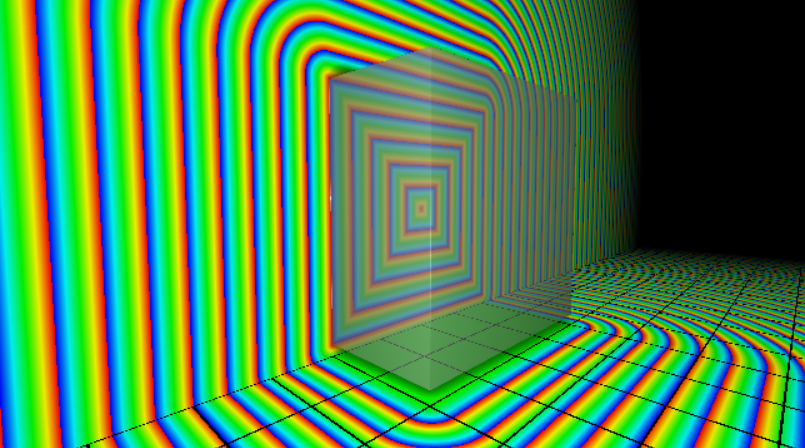
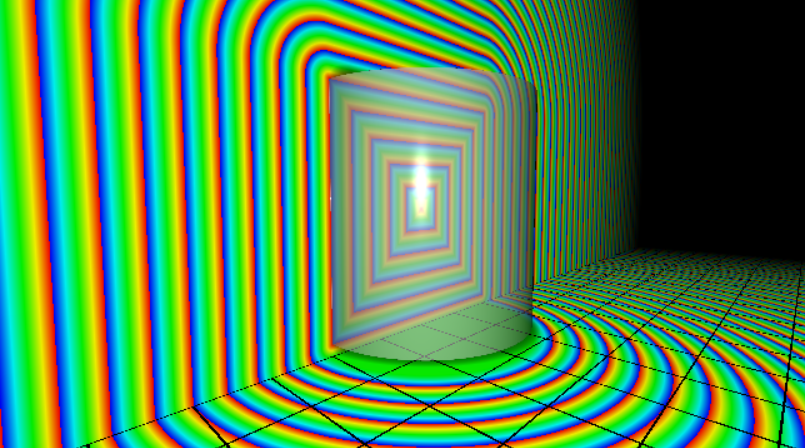
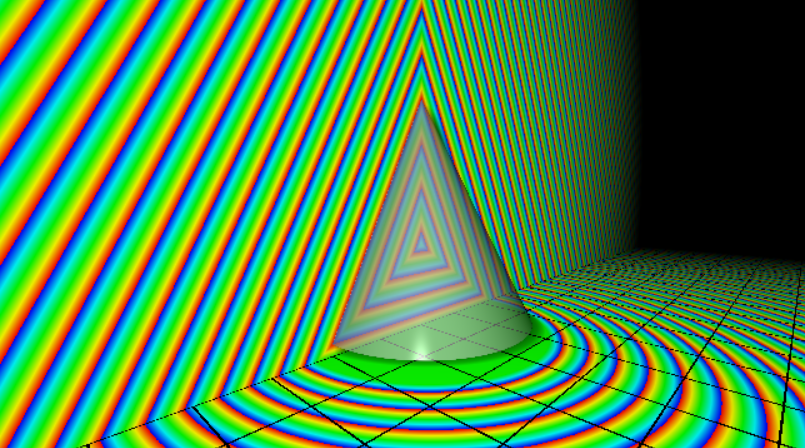
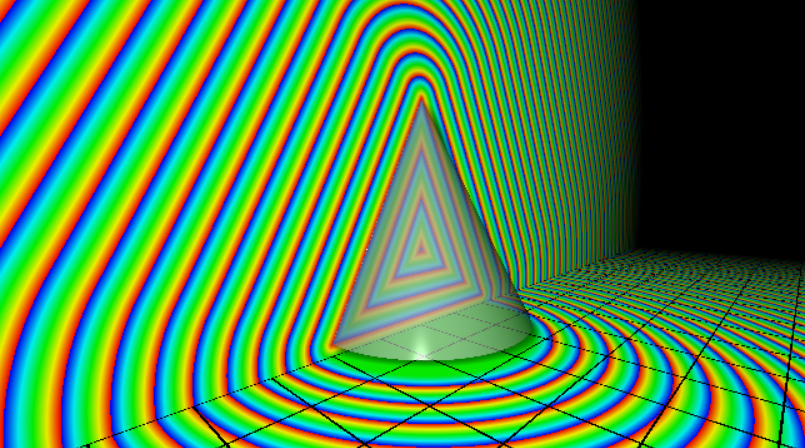
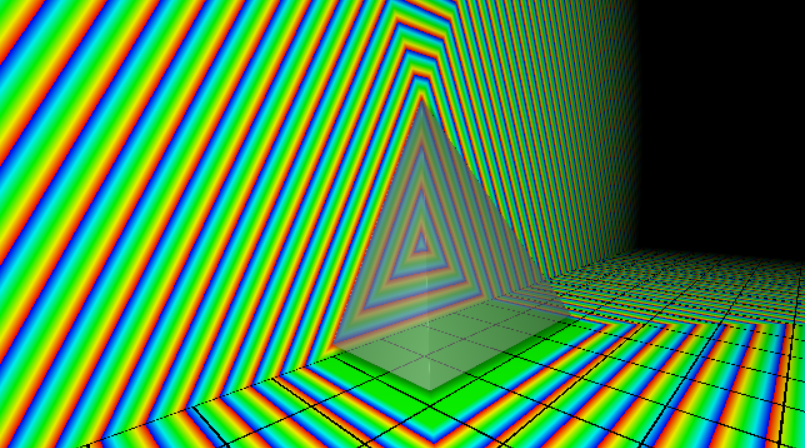
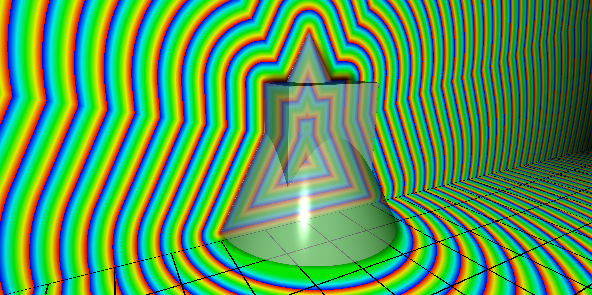
One of the most efficient ways of calculating this distance is using Signed Distance Functions (SDF). A SDF is a function that given a 3D point in space outputs the distance to the nearest surface. The distance is usually signed positive if the point is inside any object, negative if it’s outside and zero if it’s on the boundary.
For geometric figures we can define SDF’s using mathematical expressions. The great advantage of this is that the computation complexity is constant O(1) as we don’t need to loop through any data structure. Furthermore, this implicit representation is continuous and exact, unlike if it was defined with a polygonal mesh.
SDF’s of Regular Shaped Objects
The following functions in C# can be used in Unity to calculate the SDFs of regular shaped objects. As stated earlier the value is:
> 0 the point is inside the object
0 the point is on the surface
< 0 the point is outside the object
Note that we consider the objects centered at the origin of their coordinate system.
Sphere
This is the easiest one. The function returns the exact value.
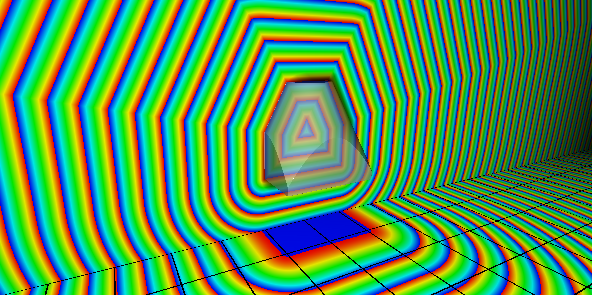
This is the visual representation of the field with isolines in the XY and XZ planes. Isolines represent regions of space where the value of the function is the same.
Sphere SDF (exact)
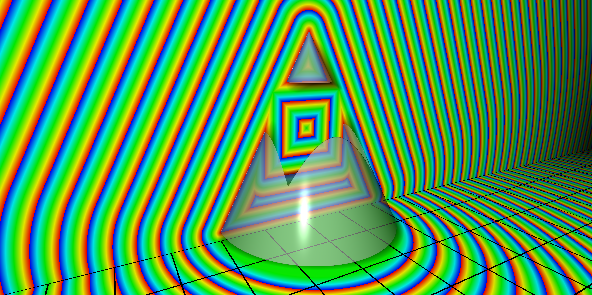
Cube
The following function is a simplification that provides the exact boundary. However, the distance values on the outside are approximations, as we can see in the sharp edges of the iso-lines. Depending on the application, these sharp edges of the isolines can be useful.
It’s time to improve my workspace. The lab is the place where I work and have fun and the same time. Wherever I lived I created a space to tinker with electronics. Now that I have my own house, it’s time to invest a little bit more. Here is a quick overview of them.
First I conquered my parents’ basement:
A lot of stuff and small desk to work in my parents’ basement
When I moved to my own place I started being cautious (you know, I don’t live alone…). I modified a standard wardrobe adding shelves, light and an anti-static mat. I also made a custom standing desk to fit the gap.
It was cool but soon it started to feel too small, specially after buying my new 3D printer. Some time later I moved the custom wardrobe out of the room and made my own desk.
Note that I modified my old standing workbench and put it sideways in order to increase the space available. I had a workspace of 1.10 x 0.5 metres for electronics (blue mat). The new bench is 3.30 x 1 metres. That’s a big change! The top layer is made of the AC6 laminate flooring, so I expect it to be durable and look good.
Now I can add keep improving my electronic lab adding more equipment if I need to :).
I’m not a big fan of public appearances, but sometimes I make exceptions. I think it can be good for young people to see engineers making stuff. In a sense that’s also one of the objectives of this website.
I’ve been asked many times about the history of Gloveone, and how it was conceived. That’s why I’ve digged in the past to let you know how it happened and how it evolved.
Hello Glove! SensaGlove v0
I was in the last year of BsC when José Pascual Molina, professor and one of the founders of the LoUISE research group at Castilla-La Mancha University (UCLM)talked to me about one problem they had at their Virtual Reality laboratory in Albacete (Spain). They had experience with many Virtual Reality devices such as head mounted displays, tracking systems, and gloves. However, all these devices were focused on the sight and hearing senses, and none of them let the user interact naturally and feel what they touched on their virtual environment. There were some haptic gloves available in the market but their features were very basic, and the price was unaffordable even for the University. For that reason, he proposed me to develop our own haptic glove.
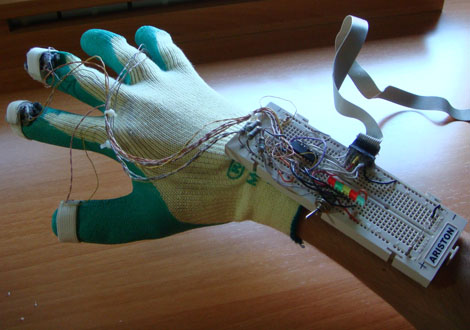
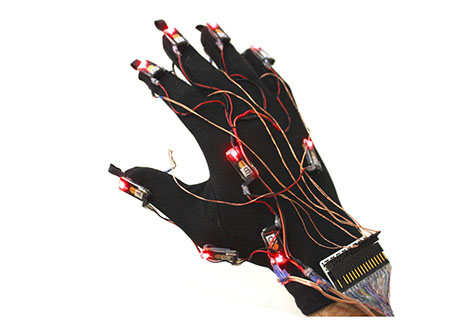
Even though my background was focused on Computer science, I was very interested in Electronics as well, so I started creating a quick and ugly proof of concept. This is how SensaGlove v0 was born. The electronics were assembled on a breadboard and relied on the parallel port to be connected to the PC. It had 3 ERMactuators (vibrators) on top of the thumb, index and middle fingers. Their intensity could be independently modulated by the software, and this vibration strength could be seen thanks to some LEDs included.
November 2006 – Sensaglove v0
SensaGlove v1
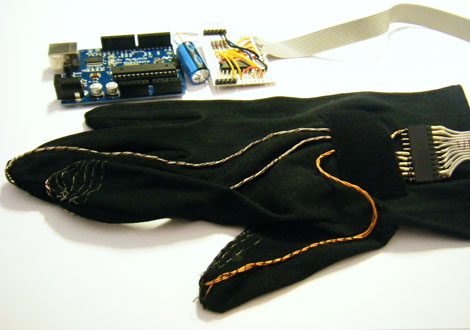
The refined version of the glove was part of my BsC final project, and it was called SensaGlove v1. All the electronics were confined to a small box and lycra fabric was used to increase the comfort. One of the main features of this glove was the possibility of attaching the actuators to other off-the-shelf datagloves. With this approach, tracking would be performed by the third party glove and haptics would be played with SensaGlove.
This version used an Arduino microcontroller, which was a quick way to boost the development of the electronics and to provide USB capabilities. Also, smaller flat ERM actuators were fitted inside the glove to improve the perceived sensations.
April 2008 – SensaGlove v2
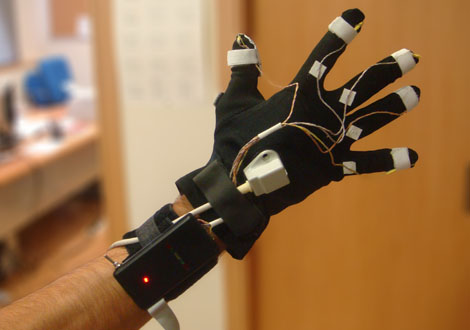
None of these three versions of SensaGlove were able to perform finger tracking by itself. Instead, they had contact patches on the fingertips to detect pinch gestures, ie. pressing the thumb against any other finger. The hand tracking (rotation and position of the hand in space) was achieved by placing an electromagnetic sensor from the Flock of Birds tracking system.
SensaGlove v3
In 2009 I started my Ph. D. advised by J.P. Molina and P. González. I focused it on the improvement of vibrotactile sensations for virtual environments. As I needed more tracking precision, I created a new version based on the optical tracking provided by an Impulse PhaseSpace.
January 2009 – SensaGlove v3
Vibrotactile technology was also pushed to the limits. To accomplish that, I created a 16 channel ERM controller with overdrive and braking capabilities. These methods were introduced in order to reduce the start and stop latency of the motors, improving the haptic response felt by the user. This controller, was also part of a generic vibrotactile tool named VITAKI (VIbroTActile KIt).
January 2009 – SensaGlove v3 controller
SensaGlove v4
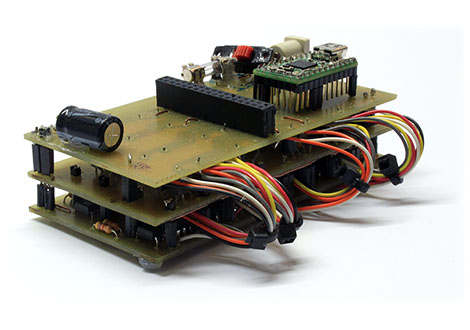
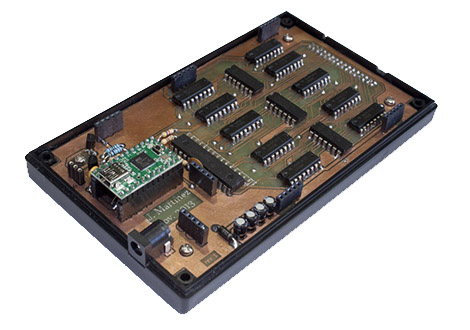
Next revision of the SensaGlove controller introduced two major upgrades. The circuit was properly routed on a single PCB, and more importantly, it featured an scalable feature: more vibrators could be connected by stacking shields on top of it (up to 16 actuators per layer). It also provided a “volume” knob to adjust the overall vibration intensity perceived by the user.
November 2013 – SensaGlove v4 controller
SensaGlove v5
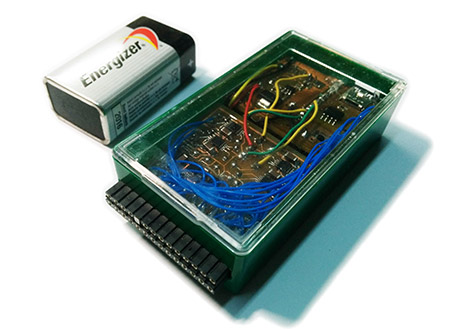
In 2014 SensaGlove went wireless. The controller form factor was heavily reduced while keeping the overdrive and braking features. As a drawback only 10 vibrators were supported. A battery, charger and bluetooth module were added to go fully wireless. The proof of concept design had three PCB’s (microcontroller, ERM drivers and bluetooth) wired and fitted together in a single enclosure.
July 2014 – SensaGlove v5 controller
SensaGlove v6 / Gloveone rev 0
I redesigned SensaGlove v6 to be used with an affordable Leap Motion tracking system. The electronics were very similar to SensaGlove v5, the only difference was that the three PCBs were routed together to reduce the wiring.
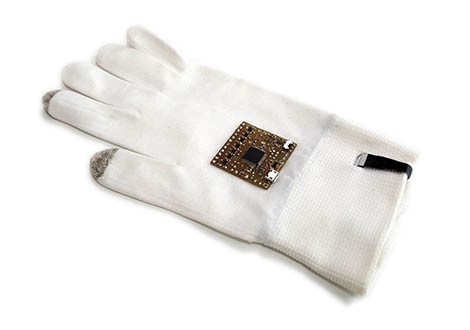
I joined Neurodigital in November 2014 to keep improving the glove and we changed its name to Gloveone. This is one of the first public appearances of Gloveone:
By the end of 2016 I decided to quit Neurodigital and started working as a freelance.
We use cookies to ensure that we give you the best experience on our website. If you continue to use this site we will assume that you are happy with it.